Showing posts with label Arts and Crafts. Show all posts

Monday, April 8, 2013

Kid-Made Plant Markers

We look forward to having a garden each year, and now that spring is here we are beginning to prepare! To get started, we've been crafting up these super easy kid-made plant markers.

kid-made plant markers for the garden

My son really enjoyed the process of creating these, and I can't get over how cute and cheery they are.  I can't wait to see lots of these colorful plant markers staking out our fruits and veggies! 

I'm excited to be sharing these over on the Melissa & Doug blog, so if you'd like to find out how your family can make their own, please visit that post for more details.

Do you garden with your kids? What will you be planting?

Read more ...

Tuesday, August 7, 2012

Paper Bag Puppet Kit

Do it yourself paper bag puppet kit


I am so excited to share this idea! I'm excited because this paper bag puppet kit was so simple to put together and R loved it. I'm also happy to say that it was a fun new activity for family time. But I'm crazy thrilled with this activity because it bought me a good two hours of (mostly) uninterrupted time to myself. And as a mother to an only child (or as a mother in general), this is huge!

The Kit


This kit was easy to put together and would make a great gift or rainy day activity. And it was cheap. I basically just gathered bits and pieces from my stash of craft materials and some paper lunch bags. I put it all in a see through container, made a cute little label, and gave it to my son to craft with and explore.


{By the way, if you'd like the above image as a label as well, feel free to print one for your own personal use. Just right click the picture, open in new tab, and print. I printed mine on sticker paper.}

contents of the paper bag puppet kit


Content Ideas

  • crayons, markers, colored pencils
  • googly eyes
  • sequins
  • glue, glue stick, tape
  • pipe cleaners
  • feathers
  • bits of yarn and ribbon
  • buttons
  • scrap paper, construction paper, card stock
  • scissors
  • cotton balls
  • scraps of felt or fabric
  • hole punch
  • paper lunch bags (brown and/or white)

The Play


I gave R the little box full of treasures and let him set up at the kitchen table. I put down an old poster board to catch some of the stray color and glue and I walked away. I went and did some chores and I just let him create. And wow did he create! He was engrossed in this craft for a long time, only stopping occasionally to show me what he had made or to go play with his latest puppet. 

creating a puppet out of a paper bag

That's the beauty of this activity. After they have fun making their puppets, they'll want to play with their new friends. It's arts and crafts, imaginative play, and storytelling all in one!

paper bag puppet play

I walked into R's playroom to find him playing with his alien puppet and his current obsession- the toys from his Safari Ltd. Space TOOB. (More on that later!) My favorite line from his elaborate plot was, "then, it was all left up to the monkey!"

The play and imagination were still going strong by the time R's daddy got home from work, so we made some puppets together as a family. We each kept our puppet a secret until it was finished. It was a nice time filled with guesses and giggles.

This paper bag puppet kit was a big hit. R has already mentioned making a few as presents, and I plan on restocking ours to put up for a rainy day. We'll be having more puppet fun in the future!

{If you enjoyed this post, please consider subscribing or following me on Facebook for more updates. Thank you so much for reading.}

Read more ...

Friday, April 20, 2012

Storytelling With Illustrations


Illustrating for storytelling

Storytelling is a staple activity in our household. It adapts well and often serves as a springboard for other activities. It's one of our favorite past-times and the benefits are numerous. Storytelling, by itself, is a wonderful way to connect with your children and it's a ton of fun. Imaginations are flexed and stretched by the power of your words. It's truly amazing. Lately, we've been adding onto the experience by illustrating our stories. It does not take the place of storytelling with words alone, but it is a wonderful change of pace with it's own pleasures and benefits.

R delights in telling his own stories and has come to love illustrating them as well. He gathers us around his easel and sets to work. He names his story in advance and sets the stage. He draws a little and then speaks. We hang on his words and his pictures. And his actions. As he draws, he further engrosses himself into his story. He begins to act out emotions. He's not reciting. He is storytelling. It's absolutely wonderful to watch.

Acting out the emotions during storytelling with illustrations
Emoting during storytelling. 

I love seeing his stories evolve along with his artwork. I adore getting a glimpse into his active imagination. He knows he's entertaining us, but I'm not sure he grasps just how much.

And he's learning. While we are being entertained. While we are bonding. He is learning.


Tips For Your Family

  • Use what you have. If you don't have an easel, this activity would be lovely done on paper while you cuddle on the couch. And, as an added bonus, you have a special keepsake afterwards!
  • Take turns. Let your children see you tell a story and illustrate it yourself. Then give them the stage and listen intently. 
  • Let go of perfection. You don't have to be an artist or a particularly remarkable storyteller. Your child will love it regardless and appreciate your effort. And, chances are, you'll get better with practice.
  • Use various voices. An easy way to make your stories more interesting and fun is to use a new voice for each character. I think the best part of that is watching your child mimic you and experiment with voices of their own afterwards.
  • Tell an array of stories. You can share a classic favorite from your childhood or make up a special story just for your child. 
  • Build a Series. Once you make up a character, perhaps based on a special little boy or girl you know, you can build upon that story by describing new adventures. It will be very exciting and give your children something special to look forward to for next time. 


*By the way, Mommy Labs has a fantastic post about the benefits of storytelling and why it is so important for childhood. I think it's beautiful and a must read.

I hope this activity is as magical for you, as it is for my family. Happy connecting!

If you enjoyed this post, please consider subscribing or following me on Facebook for future updates. I hope to continue to inspire you to savor the childhood that beckons you. Thank you for reading!

Read more ...

Tuesday, April 10, 2012

Playing Card Holder for Kids


Playing card holder made from lids

I was browsing through the book 1444 Fun Things To Do With Kids by Caryl Krueger and ran across this amazing idea!  It's a playing card holder to help kids that can play a game of cards, but can not yet hold all of their cards in their hand. Isn't that genius?! By the way, this book has a lot of other great ideas and is worth looking into. I own a copy and you can buy yours here. Or you might be able to find a copy at your local library.

Before this wonderful craft, whenever R and I would play "Go Fish" I would have to look away as he arranged his cards in front of him. But now he can arrange and hold all of his cards by himself. This makes playing cards during family game time much easier for everyone. R was very fond of this craft as well!

What You Need:

Two matching plastic lids 
Stapler
Stickers

Directions:

Put the two lids together, tops facing inward.  Staple them together in the center. To finish, use stickers to decorate and cover the staple. Yes, it really is that simple!

I used two Cool Whip lids because I liked the size. You can also use smaller lids (sour cream, dip, etc).

I hope this simple little craft changes your card games for the better!


Read more ...

Wednesday, March 28, 2012

Letter Sounds Pictionary


Letter Sounds Pictionary

We love learning through play! Letter sounds pictionary combines learning and practicing letter sounds with art and play. It's a simple favorite and all you need is a couple of willing participants and a few art supplies. We play this using the chalkboard on R's easel but you could play this anywhere using a pen and paper.

We play this game a lot to practice R's speech words. I pick a particular sound he needs practice with articulating and draw words that contain that sound. He makes guesses as I'm drawing which is perfect practice. I also like to write the word beside the picture after he guesses correctly. 

Letter Sounds Pictionary

Then he takes a turn to draw and I make guesses. He really enjoys drawing on his easel and gets a kick out of some of my silly guesses. It also helps make him very aware of letter sounds. He thinks of that sound we are working on and picks a word that contains it. We play this, primarily, to help him with his speech but he's getting so much more out of it. He is learning to decipher words.

He also insists on writing out the word beside his picture. I help him sound out the words and let him write it as he wishes. I'm not concerned with his handwriting right now. He writes because he enjoys writing and I don't want to take away that joy by correcting him. This is just what is right for my family right now, and right now he considers this play. I think he's learning enough without my corrections anyway.

R's Pictures

This activity would be a perfect addition to a letter of the week curriculum, or just as practice by itself. You can focus on one letter sound or the whole alphabet. You could even play to practice word families.

More Ways To Play:

  • Play outside with sidewalk chalk.
  • Make it a fun sensory experience by drawing in a tray of shaving cream. 
  • Draw in a patch of sand or dirt.

What are some of your favorite playful ways to practice letter sounds?

If you enjoyed this post and would like to read more like it, please consider subscribing or following me on Facebook. 

Read more ...

Thursday, February 2, 2012

Valentine's Day "I Love You" Tree


I'm ridiculously excited about Valentine's Day. I'm lucky though, because R shares in my excitement. He loves any holiday that proves itself with themed activities and fun decorations. It's a sad day at the Dinosaurs And Octopuses's home when the decorations come down. And a happy one when they go up!

We have what we call an "All Seasons Tree" that we decorate for every holiday and season. I've posted about it once before as our Autumn Bucket List Tree. Most recently it has turned into our "I Love You" tree for Valentine's Day.

The activity for this tree is for each of us to come up with 10 different things we love about each member of the family. R will secretly tell me what to write on his daddy's, and he will tell his daddy what to write on mine.  Then we'll read all of the different reasons why we're loved after dinner on Valentine's Day.

You can have one too! They are easy and fun to make and can be customized to your family. 

The tree itself is just a branch in a vase. We change up the branches, vase, and vase filler occasionally. We used white rice for the vase filler this time.

First, I got things ready by cutting out the hearts. I used scrap pieces of cardstock, but construction paper or scrapbook paper would be great too. R helped me pick out the colors and kept me entertained by telling illustrated stories on his easel. I cut out sixty hearts. Twenty for me to write on about R and Kevin, and twenty for each of them to write on. You can adjust this number to whatever you'd like, of course. The cutting didn't take long, even doing it by myself. If you have older children that can help, it would go even faster!

Next, we punched a hole into each heart. We varied the placement of the holes so that the hearts would hang differently.


Then we decorated the hearts. You could do this so many ways. We decorated ours with stickers. Lots of stickers. R loves stickers and I really wanted this project to be enjoyable rather than something that felt like work. He was actually sad when we ran out of hearts to decorate!

Finally, I attached a pipe cleaner to each heart so we could hang them from the tree. I chose pipe cleaners because I wanted to make it super easy to remove and replace the hearts. I used a third of a pipe cleaner to attach each heart.

Now all we have left to do is admire it and occasionally add another reason to the tree.


R loves to ask, "why do you love me?" as he cuddles up with us. He loves hearing all the reasons he's special, and comes up with lots of reasons for why he loves us. I really look forward to hearing what he has to say!

-------------------------------------------------------------

I've noticed that a couple other bloggers have a similar idea and have a tree of their own! If you'd like more ideas for a Valentine's Day tree, you should check out theirs!

Critters And Crayons made a beautiful tree with family pictures.
Growing A Jeweled Rose did something similar, and hers is perfect for younger children!

Have you been inspired? If you make a tree of your own I'd love to hear about it! 

Read more ...

Wednesday, January 25, 2012

I Spy Toy Collage Heart


Heart collage made with small toys

Our latest project is this I Spy heart collage made with several of R's small toys. It's currently bringing some Valentine's Day decor into R's playroom. The whole family was involved in the making of this one, and we are all pretty thrilled with the results.

What You Need:
  • One Canvas (We used 11x14)
  • Paint (For the base of the canvas) 
  • Several of your children's small toys
  • Spray Paint (For the toys- paint for plastics would be ideal)
  • Glue (We used hot glue)

The Step By Step:

The first step is to gather your supplies. This may be trickier than in other projects because some of those supplies are your children's toys. R was absolutely fine with us raiding his toy bins, and even suggested things to add. We used mostly cheap dollar store toys from his stash. You could also use toys that have seen better days. 

Arrange your toys on the canvas. Make sure you have enough. Experiment with layout. It's a good idea to take a picture of the layout you decide on for later reference.

Spray paint the toys. We used Krylon Fusion for plastics. It also works on other materials, but cuts out the prep work. We've previously tried regular spray paint on plastic toys and it wasn't pretty. My advice would be to invest (around 5 dollars) in the paint specifically for plastic for the best results. R got to use spray paint for the first time ever during this project. It was hard for him to hold down the trigger long enough so we helped him.

As the toys are drying, paint the canvas. This is a perfect job for a willing child. We used acrylic paint. Be sure to paint the sides of the canvas as well!

After everything is painted sufficiently and dry, rearrange the toys on the canvas. Get them just how you would like them and then remove one toy at a time to glue down onto the canvas. Work your way around the edge of the heart and then complete the inside.

And that's it! It's pretty simple but really neat. R absolutely loves his I Spy heart. We are getting geared up for Valentine's Day!

So what do you think? Would you consider making one of your own?


Read more ...

Thursday, January 5, 2012

Snowman Art Using Salt


R made a snowman picture using salt for a nice snowy effect. It's easy and fun and the end result is really neat.

What You Need

Blue card stock (We used construction paper because I could not find my card stock. Construction paper was okay, but after it was all dry it had a halo effect around the snowman from bleeding.)
Glue
Salt
Misc. craft items to add (We used sequins, googly eyes, and pipe cleaners.)
Crayons, markers, or other art materials to add details

What You Do


Have your child draw a line across the bottom of the paper with glue. Then ask your child to draw an outline of a snowman on top of the snowy ground. Fill in the outline of the snowman and the ground with glue. R also wanted to go back and add falling snow. Drawing with glue is great for strengthening hands!


Then they can add craft items of their choice to create a face and other details for their snowman.


After those details are added, pour on the salt! I poured some salt into a small cup and R switched between sprinkling and dumping the salt on the page. Make sure all the glue is covered with the salt. Pick up the page and allow the extra salt to fall off. Lay flat to dry.


R drew pictures in the excess salt as I made lunch. Yay for leftover entertainment value! Here's the picture he drew for me. He's a sweetie.

After it dries some you can go back and draw on further details like a hat and arms. R insisted that his looked great just the way he was, so he left it alone. Drying time will vary greatly depending on how much glue was used. And again, I recommend card stock over construction paper for this project. The construction paper bled a bit and it left a white shadow effect around the snowman, but I've used card stock for this project without problems in the past.

And that's it! The end result really looks snowy. R was very impressed that he could make a snowy picture with salt.
Read more ...

Friday, December 2, 2011

Handprint Reindeer Craft For Santa


Our first advent activity was to write a letter to Santa Claus. Each year we sit down as a family to help R write his letter. We listen to holiday music and bake cookies. We enjoy this time together. Plus, we get the inside scoop on what his heart desires the most. 

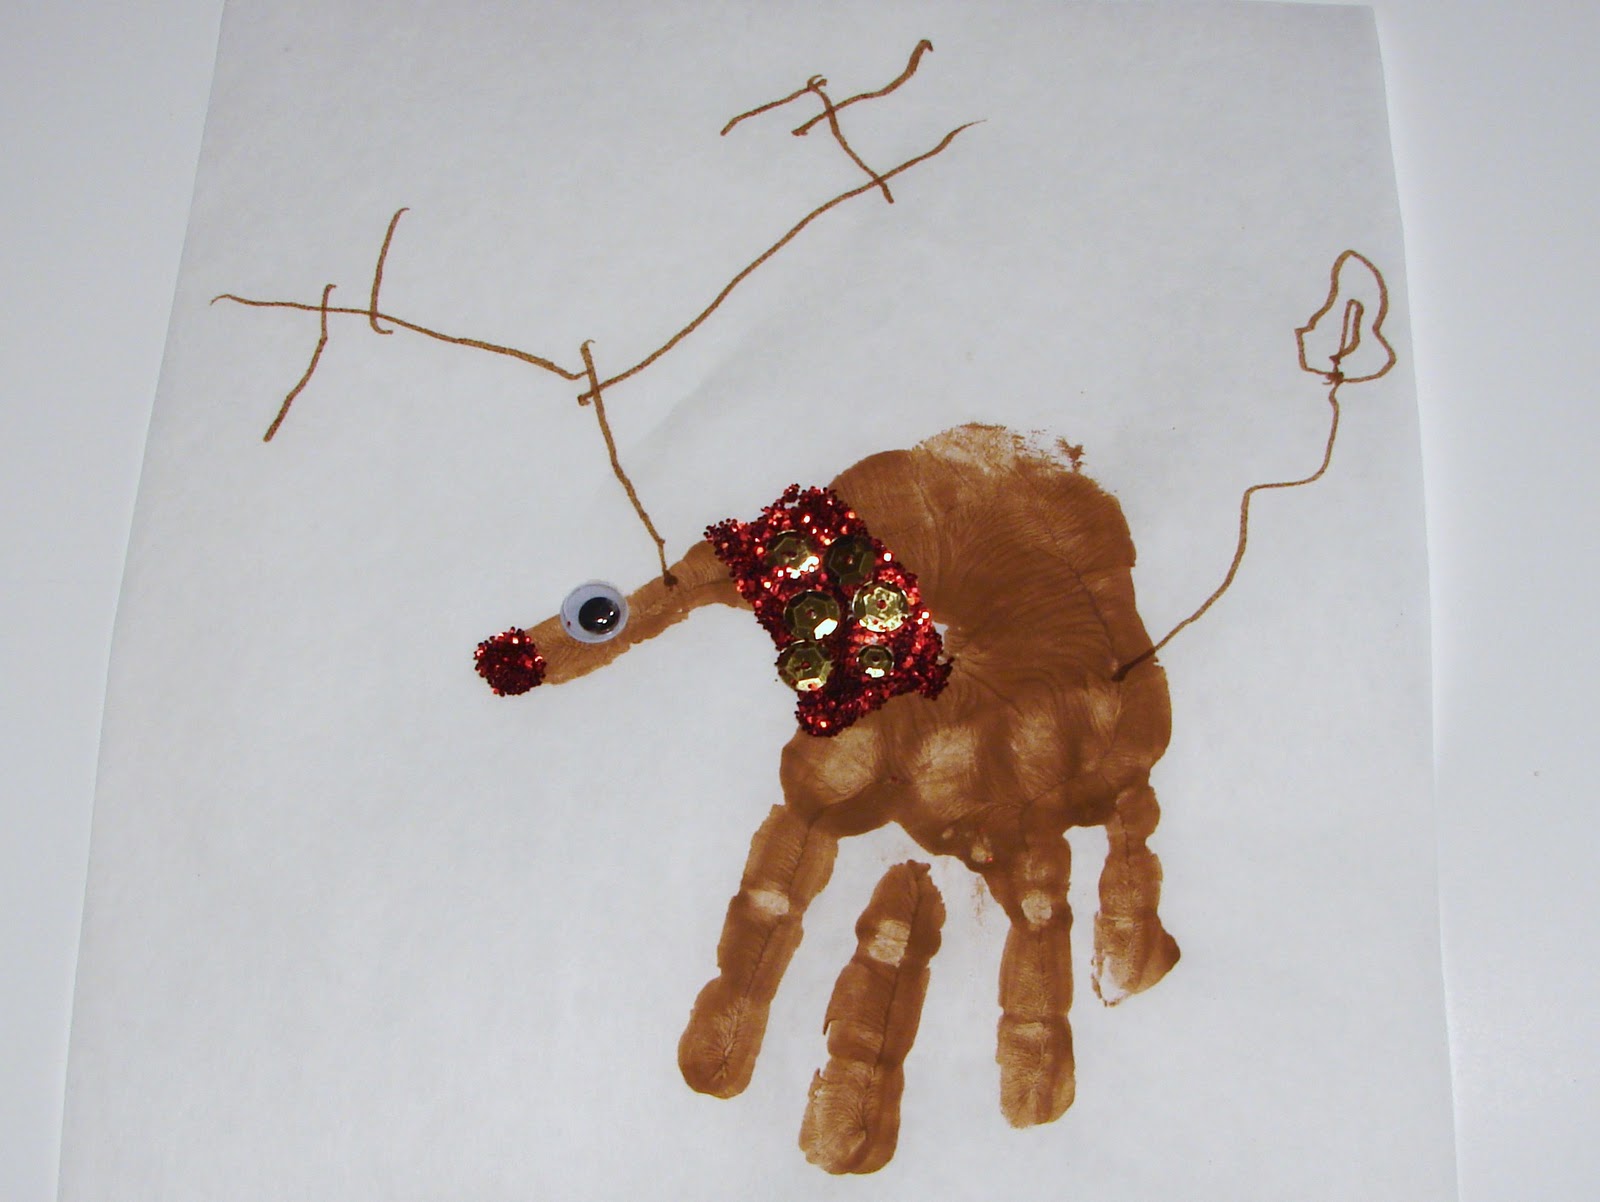
We always include at least one picture. This time R wanted to send the big guy a picture of a reindeer. He's all about the reindeer right now. And this is what we sent! 


We were inspired by this reindeer found here. We changed it a bit though, partly to make it easier to send to Santa. To make this little reindeer, I let R paint the palm of his hand. He made a hand print on a piece of craft paper and let it dry while we penned his letter. After the paint was dry he added antlers and a tail with a brown marker. Next, he added glue for the harness and nose. He dumped a lot of red glitter onto the page. He added the sequins before the glitter and glue dried. We shook off the excess glitter and added a googly eye to complete his picture. R was very proud of his creation and is certain both Santa and Rudolph will love it. I know I do. It makes me giggle.

His letter was really sweet this year. We've been trying to work on learning the polite way to write a letter and he did a good job. He had some cute questions for Santa! I'd also like to say that Santa got off easy again this year. R's biggest desire? He'd like a board game and coloring book. Yay! 

Do your children send letters to Santa?

...........................................................................................

I'm linking this post to The Play Academy.


Read more ...

Thursday, December 1, 2011

Our Magnetic Advent Calendar


Creating an advent calendar was a family affair this year. It was very easy and a lot of fun. Today is the first day of our advent calendar, but don't worry if you've been wanting to make one and just haven't yet. You could make one as a family tonight! You could even have the first day's activity to be "make an advent calendar." That's something I would totally do. Haha.

Making The Advent Calendar:

I quickly sketched out the shape of a Christmas tree on a large poster board. It doesn't have to be perfect. Then we got to work on painting it. R did most of the painting because he enjoys it so much. He did a really good job! Then just cut it out once it's dry. I traced a small cup for the ornaments. R decided he'd rather color those with markers so that's what we did. We each got our own page of ornaments to color and decorate. We cut them out and glued them onto our tree. Since we were all working together it didn't take long at all. We also made a star for on top. Next, we glued a few button magnets onto the back of our tree cut out. One at the very top, one on the trunk, and one on a few of the branches to make sure it stayed put.


Making The Day Marker:

We used a recycled crayon snowflake for the magnetic marker. We made the cute recycled crayons and glued a magnetic button to the back of one. Each day we will move the marker to the new day and read our planned activity from a list I have printed out. And because it's a crayon, we could even use it to mark the activity off of the list. I did it this way so that our calendar may be used again next year, even if we'd like to change the activities.

Making recycled crayons is very easy. We just peeled a bunch of our broken crayons and put the pieces in a silicone snowflake muffin tin. (We also made Christmas trees just because. :) We used one color per snowflake with varying shades. So all of the blue crayons went in one, the green in another, and so on. You put the muffin tin in a 200 degree oven for five to ten minutes or until the crayons have melted completely. Carefully remove the muffin tin to avoid sloshing and let cool. After the crayons have cooled and completely hardened you can just pop them out. R loves making crayons and coloring with the specially made sets.


The Creative Christmas Countdown:

I'm not going to share the advent activities we have planned just yet. Many of ours coincide with the fabulous Creative Christmas Countdown and I don't want to spoil anything for those that are reading that like surprises. I will be sharing our advent activities most days, so please check back for some fun holiday activities! Also, if you are planning on following along with the online advent calendar and would like to be more prepared or use them in your own calendar, you can find a free printable at the above link. Lots of fun in store this month!

Let Kids Create has the activity for day one of the Creative Christmas Countdown, and it's a fantastic way to kick off the season! Be sure to check out her post for an activity that will leave you smiling and creating warm memories each day until Christmas!

What are some of your favorite advent activities?
Read more ...

Tuesday, November 29, 2011

Simple Homemade Ornaments


Today I'd like to share the super cute and simple homemade ornaments we made from common household items and craft materials. R wanted to make one with a penguin sliding on it's belly. I think it's adorable and I can't wait to add it to our tree. I love that R could make it almost entirely by himself. I made one as well because I couldn't resist!

Would you like to make one with your children? This is what you'll need:


Clear plastic cups. We had several left over from R's last birthday party. I've been waiting for a chance to use them, and they are perfect for this! You will also need scissors, an utility knife, pipe cleaners, tissue paper or toilet paper, foam stickers, and poster board. You could also use the cardboard from a cereal box instead of the poster board. And really you could decorate them with a variety of materials. I typically buy the holiday themed foam sticker kits after the holiday passes and save them for the next year. They are much cheaper that way and you can use them for so many different projects. You will also need glue. I used Tacky Glue, but I imagine Mod Podge or Elmers would work.

What you do:

1. Trace the rim of the cup onto the poster board. Cut out the circle and set aside for later.

2. Use the utility knife to cut an "X" into the top of the cup. (Definitely a job for the adult!)

3. Fold a pipe cleaner in half and insert the two ends into the slit in the top of the cup. Twist and knot the pipe cleaner ends to ensure the pipe cleaner will not be pulled out. This is what it should look like. 


4. Next, you will glue a pipe cleaner around the base of the cup.
5. Decorate! I think they would be cute even if you stopped after this step.


6. Then you fill with torn bits of the tissue paper. I used five squares of toilet paper. 
7. Lastly, glue the poster board circle to the rim of the cup. 


These homemade ornaments were so easy. They didn't take long to put together and we had fun creating them. Aren't they sweet?!

What are some of your favorite homemade ornaments?

.......................................................................................................

I'm linking this post here:


Making Magical Christmas Memories
Read more ...

Wednesday, October 26, 2011

Carving Pumpkins


This year we let R(4) carve his pumpkin. This was a huge first! Didn't his turn out cute!?


We had cleaned out our pumpkins the night before for our pumpkin guts sensory bin. Lately R's attention span has been somewhat poor and I was worried about how far he'd get into this project. He has been so full of energy this past week. It's been extra hard for him to sit still. I think the pumpkins being previously cleaned out helped. He started by drawing the face, and he immediately knew exactly which face he'd like his jack-o-lantern to have. He wanted a sleepy face!


Next, I had him poke holes over his design. I thought it would make the cutting easier for him. He did such a good job and followed the lines very carefully.


Then he got to carve! We showed him how to hold his pumpkin and the carving tool while keeping all fingers away from the blade.  At first he just sawed back and forth without applying pressure to move the tool along the lines he had made, but he eventually got the hang of it. He tried really hard and was very careful while using the tools. I'm proud of him and how capable he is. I do want to say that he still didn't finish his carving. He did a good bit, but ultimately I finished his design for him. I'm sure next year will be even better.

I also thought I'd share the pumpkins my husband and I carved. I'm somewhat disappointed in mine because I had grand plans, but my attention span was awful and I grew tired of it. I wonder where R gets it?! Haha.


This is Kevin's. It's a design from a book series he loves and is currently reading (again). Extra points to whoever is dorky cool enough to know which series!


And this is mine. It is suppose to be a haunted house. Does it look like the door is open and the light is streaming out? That's what I was going for. Professional pumpkin carving is obviously not in my future, but R loved it. He said it was spooky!

At what age did your children carve their first pumpkins? Or do you have an estimated age in mind for when they might?
Read more ...

Monday, October 17, 2011

Chunkin' Pumpkin Painting

create fall art with big movements

Pumpkins + paint + big movement = FUN fall art! This activity was inspired by this post from Hands On As We Grow. It was so simple to put together and provided a lot of entertainment. For us all! 

Materials Needed:


  • Long piece of paper
  • Washable paint
  • Paper plates (or another suitable container to hold the paint)
  • Small pie pumpkin
  • Other bits of nature
  • Clean up supplies (hose, buckets of water, or mop depending on where you do this activity)


The Setup:


I set this activity up by taping a long piece of butcher paper onto a concrete driveway. {On a side note, I absolutely adore my huge roll of butcher paper. I bought a roll with something like 900 feet of paper for less than twenty dollars at my local butcher. It was way cheaper than buying a roll of paper at a school/craft supply store.} I also poured red, yellow, orange, and brown paint into four different paper plates. While I was setting up, R and his daddy went and collected other bits of nature to try and paint with. He ended up painting with pumpkins, pine cones, acorns, and a small cluster of pine needles.

The Play:


paint with pumpkins, fall art, autumn activity

He started off by dipping and rolling the pumpkin in a paint filled plate. When he thought he had enough paint on the pumpkin he would roll the pumpkin down the length of the paper. At least, it started off that way. It wasn't long at all before he was hurling it down the paper. He looked like he was bowling! And then it progressed to him getting a good running start, jumping, and chunking the pumpkin down the paper. He had a lot of fun with it. And, to my surprise, the pumpkin didn't explode.

paint with pumpkins in a big way, fall activity, autumn art

fall art, fall activity, painting with pumpkins

Have fun in the fall

Then, he tried the acorns. They made a neat splatter, but wasn't nearly as fun as the pumpkin. Next came the pine cones. He would throw them, scoot them, and roll them slowly. They made wonderful patterns. Finally, to finish his masterpiece, he painted with the cluster of pine needles. He dipped them in paint and then slapped the paper in various places.

painting with nature, fall art

paint with nature in the fall

He had a blast with this fall painting and he was proud of his "masterpiece." I plan on framing a portion and using the rest for cards and wrapping paper. I loved this activity because he had a ton of fun and it was super easy to set up and clean up. When he was finished we just hosed down the driveway. And since we used the Crayola washable paint, it easily washed out of his clothing. This is a new favorite!

Fall art, autumn art


{Did you enjoy this post? Don't miss out on fun in the future! You can subscribe or follow me on Facebook for future updates. Thanks for reading!}

Read more ...

Friday, October 14, 2011

Halloween Magnets Made From Salt Dough

make your own magnets with salt dough

We love magnets. R has always had a love for magnets and his collection has grown quite a bit. Did we need to add to it? Probably not. But we had fun making these festive magnets anyway!

We started by making the salt dough, and I have to say that R really did this by himself. I told him how much we needed for the recipe, but he did all of the measuring and mixing, rolling and cutting. It really amazes me at how fast he's growing up and how capable he really is.

make your own halloween magnets from salt dough

The Recipe:

2 cups flour
1 cup salt
1 cup warm water

Start by mixing the flour and salt. Then slowly mix in the water. We use our hands. It gets lumpy, and gloopey, and sticky before it turns into the dough. R loved that part. Then you turn it out onto a floured surface and roll it thin with a rolling pin. We also flour our rolling pin before hand, and several times during the process so that the dough doesn't stick to it. You don't want it too thin, but the thinner it is, the faster it dries. Ours typically range from 1/4 of an inch to a 1/2 inch.

Making the Magnets:


To set the mood, we listened to our "Wee Sing For Halloween" CD. It was perfect for this activity. We used our Halloween themed cookie cutters, and as R sang along to the songs he would hold up the cookie cutters that went along with it. His own musical puppet show!

A song about a spider came on and he insisted that we make one even though we didn't have a spider cookie cutter. So he decided how he wanted it to look and rolled out the dough for the legs and fangs. I just made sure they were attached to the body securely.

Then we put the cutouts onto cookie tins and popped them in the oven. We let them dry for four hours on 200 degrees F, before checking them. Most of them were done, but a few of the thicker ones were still a bit soft, so we put them back in for another hour.

make your own halloween magnets craft

We waited until the next day to paint the creations. I think he did a wonderful job. I adore his jack-o-lantern faces. After they dried, I covered them with a thin layer of Mod Podge. Next we applied the magnets and googly eyes with hot glue.

Give as Gifts!


We are keeping several of them, but plan to give a bunch away. The adults in our lives will receive a few of the painted ones, and his friends will receive a few of the unpainted. We thought that they might like to paint them instead. We will also include the googly eyes because they are fun!


{Did you enjoy this post? Don't miss out on any of the fun! Please consider subscribing or following me on Facebook for future updates. Thank you for reading!}

Read more ...